5 Ways to Get More from your Read Aloud Time


I know your reading instruction time is getting squeezed. You’re expected to meet with more groups that meet the specific needs of your students,  track more data, and now you have more required tests to prep for and give.  The one thing you don’t have is more time!

Sadly, I’ve heard many teachers say they don’t have time to read aloud to their kids because it just doesn’t fit into their schedule. What you need to do Teach Smart!  Instead of doing away with your read-aloud time, you can do more with that time.    Here are 5 tips for getting more from your read-aloud time.


1.  Choose a book that showcases a skill or strategy you're currently teaching.

That may sound simple, but you want to make sure the book is a good example of the focus strategy.  My first go-to resource is the book Strategies the Work by Stephanie Harvey and Anne Goudvis.  This essential book has suggested books for each comprehension strategy, along with lesson ideas.

There are also a lot of great websites and lists that pair up books with reading strategies. Here are a few I've used.

>>CCBC  Cooperative Children’s Book Book Center
>>The Teaching Thief
>>Kingsley Area Schools

2.  Make a plan
The plan should have the focus of the read aloud, what the teacher will do and what the students will do.  The focus will be the skill or strategy you want to either introduce or reinforce with your discussion questions.   

Decide how many pages you will read before you stop for a discussion.  For a picture book, you may choose to stop several times throughout the book.  For a chapter book, you may choose to stop only a couple of times for each chapter.  I like to write down one or two questions I want to make sure to ask during the discussion.  You will probably think of other questions during the discussions, but two is a good number to begin the discussion.  The plan should also include what the kids will do.  Will they simply join the discussion?  Will they share ideas with a partner?  Will they write in a journal?  For more ideas on how to involve students, see the next tip.  

For an idea of how to write these read-aloud plans, I've put together an example of how I write my plans. (Click here to download.) I like to have little cards with me instead of a full piece of paper.  But, you can leave these pages whole if you prefer.   I made the pages editable so you can type in your plans.  Of course, you can also print them as they are and write in your plans.   
 Planning sheet for your class read-aloud texts.


3.  Get students involved
There are times when the only reason I’m reading aloud is to simply enjoy the story.  When that is my purpose, then my students don’t need to do anything but relax and listen.  But, when I’m reading aloud with an academic purpose, then I want my students involved.  I’ve done this several different ways.

>>>Discussion sticks      
To make sure all students participate I like using name sticks.  
I keep a set of craft sticks with student names beside my reading chair.  That way I can easily pull a stick and call on random students during a discussion. 

>>> Partner sharing     To get all students thinking and talking I like using partner sharing.  After I ask a question I tell students to find a neighbor to discuss the question.  It’s a requirement that all students find a partner sitting next to them.  No one is allowed to say, “I can’t find a partner.”   I generally let students choose their own space in our listening area, I’ve had some years where that didn’t work.  So, I sometimes assign seating spaces and also sharing partners.

>>> Student Journals    At other times, I have students write their responses or thoughts in a journal.  It might be a year-long reading or literacy journal they have or a small journal I’ve put together for a specific book.  Once, when I was reading The Invention of Hugo Cabret  by  Brian Selznick,  I let the kids sketch while I was reading. That book is told partly through illustrations so it seemed natural to let the kids draw and sketch as they listened.  I limit the amount of writing I ask students to do during a read aloud because it takes up time.  Most of the time I send students back to their desks with a writing prompt. 

Reading Think-Marks are a great way to get students thinking and lead nicely into response topics. 
Reading Thinkmarks are a great way to help students focus on skills and strategies during their independent reading time.  They also make great response topics for literacy notebooks.


>>>Thinking Notes    I love, love, love using sticky notes!  They are my favorite way to get kids involved with read-alouds.  I usually have an anchor chart with the focus strategy.  But, sometimes it's just a general anchor chart called “Tune into your Thinking.”  During the discussion, I’ll ask kids to jot down their thoughts and add it to our anchor chart.


4.  Move the book to a literacy center

After you read a book aloud, don’t put it back on the shelf.  Put it in a literacy center.  Kids can read it again and again.  Picture books work well because they can be read in a short time.  But, chapter books can also be used by placing bookmarks or sticky notes so just one or two chapters are used at the center activity.  The center can work on vocabulary, phonics skills, comprehension skills, or even as an inspiration in a writing center.

One of my favorite centers is a collection of picture books.  I keep five to ten picture books there at all times.  The books may stay the same for several weeks, but I change the activity.  One week the center might focus on fluency practice.  The next week might be a character study activity and the next week might be finding the theme of the books.

If you put a chapter book in the literacy center you can have students read one of the chapters and then write a response in their journals.  Along with the center, I keep a little photo album filled with response stems and questions. The handy thing about the little photo album (from the dollar store) is I can fill it with the questions and/or response stems I want them to use that week.  I can even have these little albums set up for specific students so it's tailored to their specific needs.


5  Read it more than once
Great books can be enjoyed over and over.  Don't think that after a book is read one time you can't revisit it again later that year.  In fact, kids love hearing the stories again.  On the second read aloud you can dig deeper and show your students how to think beyond the text. 
  
Get more from your read aloud texts by placing them in a literacy center.  Kids can reread certain chapters and dig a little deeper with targeted comprehension skills and strategies.

For example, I always read the chapter book Because of Winn Dixie twice every year.  This is the book I read to my students during the first two weeks of the school year.  As I read, we talk about the important life lessons we can learn from the characters in the story.  Later in the year, usually during the last quarter, I'll read it again.  This time I'll focus on reviewing some of the reading strategies we've learned through the year.  Students will write in their journals every day, showing they can make inferences, draw conclusions, decide on the theme of the story, etc.  Many times I'll use a class set of books for my second read aloud.  That way students can follow along with my reading and then have the book to find evidence for the strategy practice that day.

I hope you've gained a few useful ideas from this blog post.  Teaching time is precious and we need to make the most out of every minute.  How do you get more out of your read-aloud time? 


9


your photo name

The Best Classroom Pet Ever!


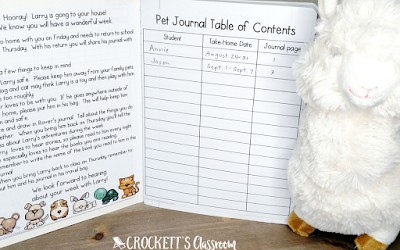
A stuffed animal is the very best classroom pet.  Kids love it and it's a great way to get kids to write in a home journal.

Have you thought about having a class pet, but don’t want to add one more thing to take care of in your classroom?  Well, I have the perfect solution---a take-home stuffed animal!  Kids love it and there is no cage or tank to clean out!


Having a traveling class pet was by far the most popular class pet I ever had.  Kids couldn’t wait for their week to take home the pet and have it be part of their life for a few days.  Of course, I had to include a journal for the kids to write in through the week.

Tips for having a take-home class pet.
1.  Choosing a stuffed animal is the easy part because kids love them all.  But, keep the size of the pet in mind.  Too large and it's difficult to transport home and then back to school.  Too small and it feels too much like a toy instead of a real pet.  

2.  Pick a traveling bag for your pet.  I like clear plastic bags so everyone can see the adorable pet inside.  Make sure it's large enough to hold the pet and the journal.   I found this bag on Amazon for under $10.  (Search "clear plastic tote" for lots of choices.)


3.  Decide on the requirements for the journal.  The requirements should be based on the writing level of your students.  Kindies can have a drawing journal where they draw a picture or two that shows what they did with the pet.  Firsties can write a few sentences along with illustrations.  For older students, they can write paragraphs and add illustrations.     Make sure all requirements and suggestions are included in the journal, so kids know exactly what is expected. 

A stuffed animal is the very best classroom pet.  Kids love it and it's a great way to get kids to write in a home journal.

4.  What will you use as a journal?  I like using a composition book.  It's sturdy and will last the whole year.  You can glue on a cover and then glue all instructions and suggestions to the inside cover.  

Click here to download this freebie from my TpT store. 

(Click on this image.)


5.  Make sure you share the journal on the day it's returned and before it goes home with a new student.  

6.  A letter home at the beginning of the year, explaining the Take-Home pet is a good idea.  That way, parents know what to expect.  I also let parents know the take-home schedule a few weeks in advance.  That way, the schedule can be adjusted if a family needs to reschedule the pet's visit to their home.

Above all, have fun.  Just like a live pet, the stuffed animal pet is a great way to teach responsibility. 


Do  your students want a classroom pet, but you don't want the mess?  Then I have the perfect pet for you!


7


your photo name

Make it a Poster!

Turning a single page .pdf file into a large display poster is super simple.  It's an easy way to create anchor charts and other displays for your classroom.

You’ve just purchased the most adorable digital product and there are a couple of pages you’d like to display in your classroom.  But, no one will see them at their current 8.5 X 11 size.  What do you do?  Turn the page into a poster.  It's super easy .


I guess the easiest way is to take the file to Staples or Office Depot and have them pint it for you.  They also have online poster printing that starts at $12.99 for a 18" X 24" poster.  They have lots of options for paper types and it can even be laminated.  The finished poster will look great, but may not be so easy on our pocketbook.

Or, you can print your own poster!  Any PDF file can be printed as a poster.  First you need to start with a .pdf file.  You can convert most other file types into a .pdf file. Other file types might have a poster printing options, but I'm not familiar with them.  So, I'm going to explain how to print a poster from a .pdf file.

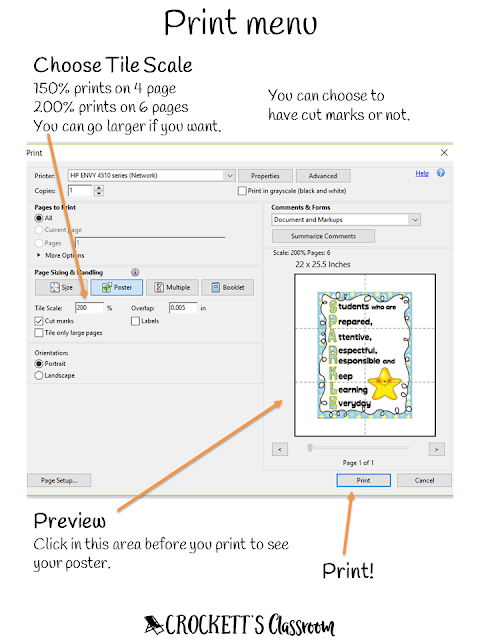
Step 1, print.  From the print menu you can choose the size, cut marks and see a print preview.
Turning a single page .pdf file into a large display poster is super simple.  It's an easy way to create anchor charts and other displays for your classroom.
Step 2:  Cut.  I use a paper cutter so all the edges are straight.  Make sure you leave one edge with a white paper margin so the piece can be glued to the piece that will be beside or below.
Turning a single page .pdf file into a large display poster is super simple.  It's an easy way to create anchor charts and other displays for your classroom.
Step 3, Putting it together.  A repositional glue stick makes moving and adjusting the placement much easier.  After I have all the pieces glued together I secure all the seams with tape (on the back).
Turning a single page .pdf file into a large display poster is super simple.  It's an easy way to create anchor charts and other displays for your classroom.
That's it!  you now have a poster large enough to display in your classroom for everyone to see.  This is my favorite way to make anchor charts since I can't draw with a darn!  Here's one I made for a lesson on subjects and predicates.
Turning a single page .pdf file into a large display poster is super simple.  It's an easy way to create anchor charts and other displays for your classroom.


Turning a single page .pdf file into a large display poster is super simple.  It's an easy way to create anchor charts and other displays for your classroom.


2


your photo name

Increase Student Success with Academic Vocabulary

In order to succeed in academic tasks, students need to master the vocabulary they'll encounter.  That's why teaching this academic vocabulary is vital for each student's success.


We spend countless hours teaching the reading, writing, language, and math skills our students need.  Then, we give them hours and hours of practice, reteaching, and review.  We're confident they've mastered the skills, yet many of them don't perform well on academic tests.  The reason might be the vocabulary used on these standardized tests.  

 Studies have shown that the size of a child’s vocabulary is an accurate predictor of academic achievement (Hirsch, 2013). However, academic vocabulary is more specific. It is the words used in an academic setting, including textbooks, class discussions, and standardized tests. These words are not learned through casual conversations in our daily lives. Students need direct instruction and focused lessons to master the words they encounter in an academic setting.

How many times did you wonder if your students truly understood what the question on a standardized was asking?  Did you ever say to yourself, "If only I could explain the question differently, I'm sure my students would understand?"  They may know the information, but the vocabulary in the question may have confused them.  And we all know that if you don't understand what a question is asking, then how can you answer it. This is why teaching these essential words is important and making them part of your students’ everyday classroom vocabulary.

What are the most essential academic vocabulary words? Experts have said there are about 300 academic words that should be taught through direct instruction. Of course, you don’t teach them all at once. But these words should be taught over the course of a child’s school career through different content areas. Many schools have developed lists for each grade level and/or subject area. Check to see if your school has such a list.


Most kids get stuck on the verbs in test questions more often than the content nouns. So, this is a good place to start your academic vocabulary lessons. The resource I used the most to kick-start my vocabulary instruction is by Marilee Sprenger. Her wonderful book, Teaching the Critical Vocabulary of the Common Core (2013), gives definitions, examples, and suggested activities for 55 (verbs and nouns) of the most commonly used words in the Common Core Standards.   I liked the first book so much that I bought her second book, 101 Strategies to Make Academic Vocabulary Stick.


No matter what your opinion is on standardized or objective-based tests, they seem to be here to stay for a while. So, we must ensure our students have the vocabulary skills to perform their best on these tests.  

One of my goals is to incorporate these verbs into my daily lessons.  I wanted my kids to hear, see, and use these words as frequently as possible.  That way, when they encountered them on the "big test" at the end of the year these verbs wouldn't cause any confusion.  I wanted my students to be able to answer the content of the question without getting hung up on what the question was asking.

I decided to introduce each word with a short PowerPoint presentation.  In the presentation, the word is defined, a sample question is answered, the word is applied to an everyday situation for a partner talk, and a short activity or printable that can be used in a class lesson.  

Here's how I introduce the essential 29 verbs:
1.  On the first day, I show just the first two slides (definition and sample question).  We talk about the word and definition and answer the sample question.  The sample questions I created go with well-known fairy tales.  I wanted to ensure I used a text familiar to all my students.  You could ask questions about your current read-aloud text.
2.  On day two we review a couple of the verbs from previous lessons and then do the third slide for the new word (small group or partner talk).  For the group or partner talk, they have three questions that use the verb in an everyday context.  They can answer one, two, or all three of the questions.  We also take time to share some of their discussions.
3. The next day would begin with a review, and then the fourth slide would be presented.   The fourth slide is an activity that can be incorporated into a content lesson.  The activity is usually a written task or thinking organizer.
4.  On the last day of the week, we would add the word to our Word Jar journals. (See the link to this freebie below.)

At the end of the week, we add the word to our class display.  These academic vocabulary words remain on display throughout the school year.  The kids are often the first to point out that one of these words was on a test or academic task.  Leaving them on display also reminds me to use those words in my directions and class discussions.  


By taking the time to give my students this direct and focused instruction on academic vocabulary, I know they'll be better prepared for all academic tasks and standardized tests.  Now, I'm much more confident my students won't be confused by what a test question is asking them to do.  They'll be able to focus on the task and apply the skills they've mastered.

Would you like to try this in your classroom? Click on the image below to download a free sample of the Academic Vocabulary PowerPoint and printable resource I've described in this blog post.
   
Check out this free sample to see how you can help your students master the academic vocabulary they need to be successful on academic tasks and tests.
 

Another great way to help your students master these words is to start a special journal, a journal just for words.  At the beginning of the year, I love reading Donavan's Word Jar.   It's a great book about a young boy who starts collecting words, and it inspires my kids to become word collectors themselves.


 I created this freebie so you can also turn your class into word collectors!  Word Jar: A Word Collection Journal  


1


your photo name

Digital Task Cards, A Must for Every Classroom!

Have you tried digital task cards?  Kids love them, and so will you.  Find out why teachers are falling in love with these task cards.

Task cards-- love them!  They're great for individualizing, class scoot games and for learning centers.  And have you heard about digital task cards!   Boom Learning™ has digital cards for every subject and every age. 

With technology becoming a bigger part of our classrooms and home schools it's time to look at the benefits of using digital task cards. 

If you're tired of all the laminating, cutting, organizing and storing of task cards, it may be time to switch to digital.First off, there's less prep.  You don't have to print, cut, and laminate the cards.  That also means less $$$!  Plus you don't have to come up with a way to store them and you never lose them!  No more little baskets, boxes, rings, and files cluttering up your shelves and cabinets.  Digital task cards are always within reach with your device. Kids can log in to Boom Learning™ and access their cards anytime. Boom Cards™ can be used on laptops, desktops, tablets, iPads and even cell phones!

Instant feedback    With the digital cards kids know right away if they're correct or not.  No more turning in their recording sheet for the teacher to check and get back to them.  This is so much better than letting kids check their own task cards with an answer key or QR code.  With some students, I was never sure if they used the answer key before or after they wrote their answer!

Record Keeping at your fingertips!   The Boom Learning site keeps track of your students for you!  You can see what decks they've completed and how they did on each card.  You can't get any easier than that.  The system lets you assign decks to your whole class or to the individual student.  Super easy way to individualize.

Use in a variety of setting.   Just like printed task cards, digital cards can be used for individual students, in learning centers, and with your whole class.  If you have literacy or math centers, set up your tablet, iPad or computer to access the Boom Learning™ site, kids will have their own login and they're all set to begin working on the assigned decks.  Now, you can also use the task card decks with your whole class with a feature called Fast Play.  You can get a Fast Play code for any of your decks.  Simply input that Fast Pass web address into your computer and project it onto your whiteboard. This makes it a great way to introduce a new concept or review a skill. 

Finally, it's fun!  Kids love technology.  They're more motivated to work through 25 math problems when they get instant feedback and earn little rewards.  


Do you still want to hang on to your paper task cards?  Don't worry, you can have both!  I've been converting some of my print task cards to digital, which are available in my Boom store. (Crockett's Classroom on Boom)

But now, some of the task cards in my TpT store have companion digital sets on Boom.  When you purchase the set from Crockett's classroom on TpT you'll get the printable task cards and a code to access the deck on Boom Learning™.  How amazing is that! 

Verb task cards.  Try out the print and digital versions!

I've created a special category in my TpT store called Boom Cards. This category will soon be filled with sets of printable/digital task cards.  I'm starting with a set of free task cards for Verbs (action, helping and linking)

Disclosure:  I am receiving renewal of my Boom membership for writing and publishing this blog post about Boom Learning and Boom cards.


2


your photo name

The KWL Chart -- New and Improved!


It's time to get rid of that old KWL chart!  Check out these versions that reflect what student learning really looks like.

      KWL charts have been around since the early 80’s.  Chances are you’ve used them either as a student or as a teacher,  maybe both. I remember thinking the traditional chart with three columns were wonderful.  I used them for so many of my science and social studies lessons and thought they really helped my students organize their thoughts and learning.  They guided a lot of our informative research and writing. 


    Well, it’s time to bring the KWL chart up-to-date.  I’ve found several really interesting ways this chart has been adapted.  Some are still simple and adaptable to many lessons, but others are more specific and may not fit with a wide range of activities.  Here’s what I found---

Traditional KWL
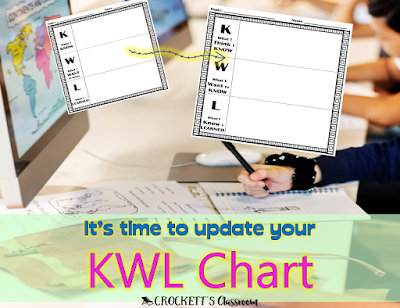
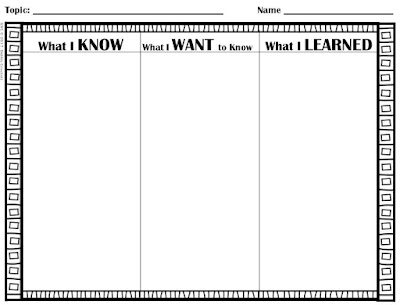
Let’s start with the oldie, but goodie.  The three columns stand for What I Know, What I Want to Know and What I Learned.  This is pretty straight forward and kids easily understand them.  After only a little whole class practice, students are able to use this chart on their own.  What I love about this chart is the versatility.  It can be used for almost any lesson or activity. (Click on image to download this organizer.)
Traditional KWL chart, simple and easy way to organize information for both literary and informative text

With the traditional KWL chart, it's simple and easy to organize information for both literary and informative text  
Literary Text--
K:  background knowledge    Students list what they know about the topic, characters, or setting.  Students can even list what they know about the genre.
W:  Want to find out.     Students can make predictions of what they think will happen. Predictions can be added or adjusted as they continue to read. Questions they want to have answered as they read the story can also be written here.  Then if the question is answered it can be moved over to the Learned column.
L:  Learned from the story.    Students can write a summary of the story, or the lesson learned in the story.  Their predictions can be checked and their questions can be answered.

Informative Text,  video or movie, science experiment --
K:  Previous knowledge     What knowledge do students already have about this topic.  This could come from previous experiences, books they’ve read, movies or TV shows they’ve seen.  It can also come from previous lessons or activities.
W:  Want to learn     What do the students hope or want to learn about the topic.  Questions are best for this column because they easily lead to searching for answers.

L:  Learned from the text       Any facts and information that students learn from the text can be written in this column. The facts do not have to pertain to what they wrote in the W column. But, if they do answer one of the questions from the W column, it can be moved over to the L column as they write the answer.


Thinking KWL Chart
I really, really like this KWL chart.  It values the knowledge that students already have about a topic but requires them to find evidence to support their ideas.  Let’s face it, kids know a lot, but it isn’t always accurate.  I also like the fluidity of this chart.  Instead of writing on the chart, I like to have kids write on small sticky notes.  These notes can then be moved from column to column as they read and research.  
This thinking KWL charts adds extra accountability to the traditional KWL chart.

Here’s how the three columns work;


K: What I Think I Know-  The first column is the biggest change from the traditional KWL chart.  Kids can write down any facts, background knowledge or information they think they know about the topic.  The emphasis, though, is that this “knowledge” may change once they begin researching or reading the text.  Perhaps they write “bears hibernate” in the first column. But, from their research, they find out that they don’t truly hibernate.  They go into a torpor or a deep sleep.  Bears can be woken up quickly and easily from this torpor state, unlike hibernating animals. The note about bears hibernating can now be updated and moved to the last column- What I know I Learned column.
W:  What I want to Know-  In this column students write notes about what they'd like to learn, or questions they have about the topic or story.  As they read and research, they can update these notes with their new knowledge and move the note to the last column.
L:  What I know I learned-  The last column is where all the notes from their research are collected.  Only notes that have text-based evidence can be placed in this column.   Notes from the first and second column are moved here as soon as they are proved by the research and reading.


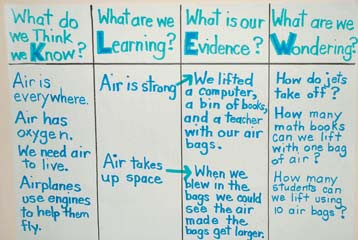
The next KWL chart comes from an article I read on the NSTA blog.  It describes a KLEW chart.  


KLEW chart from a third grade science lesson, One type of KWL chart reviewed in this blog post.
http://www.nsta.org/publications/news/story.aspx?id=51519
I like how this chart guides students through their research.  The first column lists what students think they know, just like in my Thinking KWL chart.  In the second column, they record what they are learning, followed by the third column which lists supporting evidence.  The last column lists questions for future research.  To read how a third-grade teacher used this in her science lesson you can read the full article here:  Evidence Helps the KWL Get a KLEW.


Is your KWL chart up to date?  Check out new ways to use this organizational chart with your students as they read literary and informational text.

0


your photo name

5 Ways to Engage and Motivate at the end of the School Year

As the school year winds down, it's not easy to keep your kids engaged and motivated to keep learning.  Here are 5 ways to keep them going until the very end.


     How do you stay motivated through the last few weeks of school?  For me, this was the toughest time of the school year.  Testing is over, summer is almost here and kids have a hard time staying focused. To be honest, teachers have a hard time staying focused, too!  So what can you do to stay motivated and keep your students engaged in valuable learning experiences until the very end?

Mix It Up!        One thing that works for me is to rearrange my daily schedule.  I might add something new to the morning routine or move a subject I normally teach in the morning to the afternoon.  A really easy change could be the morning sponge activity.  Instead of the daily language, math or reading review have them start with a drawing/writing activity.  Write a prompt on the board and tell the kids they have fifteen minutes to draw and then set the timer for a 5-minute quick write.  At the end of the quick write, we take a couple of minutes to share and then the paper is put in our writing folders. Students might want to expand the writing at a later time.


Brag About It!       Add a new element to your behavior system.  Kids love brag tags so why not add a weekly brag tag.  On Monday I display the brag tag that kids have the chance to earn through the week.  We talk about the behaviors or qualities they need to display through the week in order to earn the new tag. I also give them each a brag tag nomination slip.  They can fill out the slip to nominate someone else in the class who they think has earned the weekly brag tag.  Nomination slips are placed in a box.  I go through the slips after school and give out a few tags the next morning.  On Thursday I have every student fill out a slip in which they nominate themselves!  They are asked to explain what they’ve done to earn the weekly brag tag.  This makes it possible for every student to earn the brag tag by the end of the week. 
Click on this image to download this free sample so you can get started with brag tags.

Give your kids brag tag goals.  This allows you to focus on specific behaviors for the week.

Expert for the Day.    I start this project about 30 days before the end of the year.  Each student chooses a nonfiction book with the purpose of learning something new.  They read the book and do some online research to become an expert on the topic.  Then they are scheduled to present what they’ve learned as the Expert for the Day.  Depending on the time you have, you can schedule 2 - 4 students to present each day.  Or, one year we invited parents in for our Expert day.  The kids set up around the room and parents wondered through listening to the short demonstrations. Their presentation includes a demonstration along with visuals to display their new knowledge.  Everyone loves seeing the creative way our classmates share their expertise. 


Put on a production.       Kids love to ham it up so putting on a little play or reader’s theater is the perfect way to keep kids engaged during the last few weeks of school.  Reader’s Theater scripts are my favorite.  There are so many free scripts available is a wide range of topics.  You can even have students take a well-known story and turn it into a script themselves!
Here are a few online sources I’ve found:

Timeless Teacher Stuff-- http://www.timelessteacherstuff.com/

Start a project.       Now that your state testing is over you have time for a fun project.  Research projects or book projects are perfect because they can incorporate reading, writing, science, social studies, art, and music.  One of my favorites is a wild animal park project. The kids are divided into groups.  Each group will research the animals and plants for a specific habitat.  Then the group creates the part of the wild animal park for their habitat.  The parts are put together to create the class park.  You can do sooooo much with this type of project; research, math problem solving, studying animal and plant adaptations, write songs or poems, etc.  This project is available in my TpT store.  Click on any of the images to check it out.


     No matter how you spend the last few weeks of school I hope you remember to take care of yourself.  If you don’t, you won’t be able to enjoy your kids.  The year has been long and probably very challenging at time.  Remember to take the time to reflect on the growth and accomplishments of your students.  And never forget the positive impact you’ve made on their lives.
As the school year winds down, it's not easy to keep your kids engaged and motivated to keep learning.  Here are 5 ways to keep them going until the very end.

0


your photo name
Back to Top