Poinsettias

Easy Poinsettia
Make this easy poinsettia flower with your kids.


I love making this easy holiday poinsettia with my kids.  It's super easy and makes our room look so festive.

Materials:  
Large, medium and small petal templates, 
red, pink, white, and green construction paper,
brad, glitter (optional) , single hole punch tool


Your kids will love making these super simple Christmas flowers to decorate your classroom or home.
1. Make enough leaf templates for students to share.  I made the templates with tagboard or card stock.  The thick paper is easier to trace around and should last for several holiday seasons.


2. Students will choose to make a red, pink, or white poinsettia.

Your kids will love making these super simple Christmas flowers to decorate your classroom or home.


3. Each poinsettia needs 3-5 small, 3-5 medium, and 3-5 large petals of the chosen color. The flower also needs 3-5 large green petals. Students trace and cut out the leaves they need for their flowers.


4.    Punch a hole at the end of each petal.

Your kids will love making these super simple Christmas flowers to decorate your classroom or home.


5.   Put brad through each petal going from smallest to largest so the brad opening ends up at the back.

Your kids will love making these super simple Christmas flowers to decorate your classroom or home.


6.    Spread out the leaves

Your kids will love making these super simple Christmas flowers to decorate your classroom or home.


7.    You can add a few dots of white glue and then sprinkle on gold glitter. This step is optional.


Your kids will love making these super simple Christmas flowers to decorate your classroom or home.


These look beautiful displayed around the room during the holiday season.

Click here for directions and patterns.


1


your photo name

Gingerbread Man

Spicy Gingerbread Man


Your kids will love making these gingerbread men.  With the paper stuffing and real spices, they'll be almost like real cookies. 

Materials:  gingerbread man template, large brown paper bags (have the kids bring them in), glue, spices (ginger, cinnamon, allspice, nutmeg or any other spice you have that smells like yummy cookies), small pieces of tissue paper.


1.    Copy patterns heavy card stock or lightweight cardboard to use as a tracing template.  I usually had one template for every 4 students to share.  You can use the templates for many years.


2.    Students trace and cut out two gingerbread men from the brown paper bag.  It’s okay if there is printing on the bag.  It can be on the inside of the gingerbread man.


3.    Color one side of the gingerbread man.  You can also glue on ribbons, glitter, sequins or any other decorations you have on hand.


4.    Put glue around 3 sides of one gingerbread man piece.


5.    Place the other gingerbread man piece on top and let the pieces dry for 10-15 minutes.

6.     Crumple the tissue paper and use it to stuff into the gingerbread man through the open side.  Gently push the tissue paper into each arm, leg, and head with the eraser end of a pencil.


7.     Put the spices in the center of a piece of tissue.  Fold up the tissue and stuff it into the gingerbread man.


8.     Glue the open side together.


0


your photo name

Stitched Stocking

Stitched Stocking
0


your photo name

Paper Strip Trees


Paper Strips Tree


Materials: Strips of paper ½” wide.  For younger children you can use wider strips.

For hanging tree:  ribbon, bell

For card:  8 ½ X 11” piece of white card stock folded in half.


This easy craft is super cute.  The uneven layers make it even more adorable.

1.Cut ½” strips of paper.  You can use paper with a printed design or plain, colored paper. 

Hanging Tree:

     Plan the layers by putting two strips back to back.  The next layer should be slightly smaller, keep going until you reach the top.

When you’re ready to glue the tree together, tie the bell on the end of the ribbon.  Lay the ribbon on a flat surface.  Take the longest pair of strips and put glue on one piece.  Place it under the ribbon and put the matching strip on top.  Make sure the strip is centered on the ribbon.  Continue gluing the strips up the ribbon.  Tie the extra ribbon at the top to form a loop.


Card:  Glue the longest strip at the bottom, continue gluing shorter strips up the front of the card to form a tree shape.  Draw a star, cut it out and glue it to the top of the tree.


0


your photo name

Paper Strips Ornament Ball


Paper Strips Ornament Ball


Materials: 8 strips of paper (1” X 6”) for each ornament.  You can use printed paper, or plain paper and let students color or decorate the pieces. Two brads, 8” thin ribbon, bell, hole punch.


1.Cut the strips and punch a hole at both ends.  It might save time to have the holes punched before you give them to the students.

2.Put the brad through the bottom holes for all 8 pieces.

3.Make sure the brad will open on the back side of the

          paper strips.

4.     Put the bell on the ribbon.  Put the ribbon ends through

         the top hole so the bell stays on the back of the strips,

         which will be the inside of the ornament.

5.Put the other brad through the hole with the

        opening on the inside,  by the bell.


6.     Spread out the strips to form the ball.


0


your photo name

Rudolph Race

Reindeer Race

This is a fun game that can be played with 2 to 12 students.  The best number of players is 3 to 5.

Materials:  Reindeer Race game board, two dice, one marker for each player. Small buttons or 1 cm cubes work well for the markers.

1. Students choose a number from 1 to 12 and place their marker on that number at the bottom of the game board.

2. Someone rolls the two dice.  Add the numbers on the dice and move that reindeer up one space.  If there is no reindeer for that number, no one moves. No matter who rolls, the reindeer with that number gets to move up one space.

3. Let the next person roll, add the numbers on the dice and move that reindeer.

4. Keep rolling and moving until one reindeer crosses the finish line.

5. The reindeer who was in last place gets to be the first to choose their number for the next race.

Students soon learn which numbers have the greater probability of being rolled with two dice.


0


your photo name

Christmas Craft: Cinnamon Dough

Cinnamon Dough Ornaments
0


your photo name

Dreidel

0


your photo name

An Orange for Frankie

An Orange for Frankie
Book Chat and Craft


Patricia Polacco has several wonderful books that are perfect for the holiday seasons.  She draws on her childhood memories to share heartwarming stories about Hanukkah, Christmas, and Epiphany.

This activity is a sample from my Holiday Reading with Patricia Polacco. The full version is available in my Teachers Pay Teachers Store.


 (Click on the picture to download the sample.)
 

In the sample, you get the story chat chards, the mini-folding book, and directions for making an orange/clove holiday decoration for the book An Orange for Frankie. 


Click here to see the Holiday Reading in my TpT store.


0


your photo name

Snow Window Snowman

Snow Window Snowman


Materials:  snowman pattern copied on heavy white paper.  Clear piece of cellophane,  plastic snow pieces or glitter. You’ll also need a scrap of fabric for the scarf and small piece of orange paper for nose.  Optional:  googly eyes,
1.You can copy the snowman pieces on card stock for each student or make templates out of lightweight cardboard and let students trace and cut them out. I usually had one template for every 4 students to share.  You can use the templates for many years.
2.Cut the center out of the front snowman.  Glue the clear cellophane  around the circle.  (Make sure the side with the black lines is on the inside so they don’t show when you’re finished.
3.Students can draw face features or use scraps of paper to cut out nose and eyes.
4.Lay the front snowman piece face down on the table,
       put glue around the edges and place the snow pieces
       on the cellophane.  Then put another line of glue around
       the  circle opening.  This will keep the snow pieces in the
       window area.
5.Let the glue dry for 10-15 minutes.  Then you can add the scarf and  a ribbon at the top if you want a hanging ornament.

0


your photo name

Stained Glass Tree


Stained Glass Tree


This sun catching tree is super simple to make.  Copy the pattern on green construction paper.  (The picture makes the tree look black, but it is actually green) Cut out the center.  Have lots of ½” strips of black construction paper ready.  Students glue the black strips to the back of the tree, crisscrossing to form different sections.  Caution them to not have any spaces that are too small.  Then cut tissue paper to fill the spaces.  If you want, another green tree shape can be glued to the back to cover the paper ends.


0


your photo name

Most Wonderful Time of the Year!


The season we’ve waited for all year is almost here!  Thanksgiving is just a warm up for the big event in December.  My birthday!  (just kidding) Even though my birthday is December 24, it doesn’t compare to the excitement of Christmas.

The weeks leading up to the holidays can be some of the most precious time you spend with your students.  Over the years I’ve read lots of holiday books, cut out thousands of stars and used gallons of glue and glitter.  I’d like to share a few of my favorite books and craft activities and maybe you’ll find a few new ideas to share with your kids (at school or at home).
I plan on adding a new idea every other day until December 23th.  So check back often to download all the holiday ideas.
Pattern and directions for making these standing reindeer.

The first craft is a standing reindeer.  I found a picture of these adorable reindeer in a magazine about 10 years ago.  I drew the pattern and my students have loved making the pair of reindeer every year since.  I scanned my pattern for you to download.  I'm not a clip artist so the pattern is kind of rough, but should work fine when you make copies for your students.


Copy the pattern on brown paper, or on white paper for the kids to color. Fold in the middle, then glue the sides together.  Clip on two clothes pins for the legs.  Then you can add pipe cleaner antlers, googly eyes, pipe cleaner wreath, a string with a bell, ribbon bows or any other adornments you can think of. My class reindeer turned out different every year.  It all depended on what scraps of materials I had on hand.  Have fun with you class reindeer herd!

Click here for directions and pattern.


0


your photo name

Snowman Ideas


An Avalanche of Snowman Ideas

  Brrr!  Its cold outside.  Well, not really.  Here in the deserts of Arizona we like to pretend it's cold outside.  One way we get in the winter spirit is to bring some fun "frosty" activities into your classroom.

Who doesn't love snowmen!  I grew up in the Midwest and remember spending the day outside building a snowman and then clomp, clomp, clomping back into the kitchen where my mom would pour me a cup of hot chocolate.


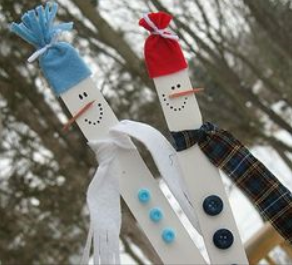
Since my students can't build snowmen outside, we do it in our classroom.  My favorite is the snowman fence.

  1. Get a free paint stick for every student from your local home store.

  2. Students paint the sticks white.

  3. They can use markers for the eyes, nose and mouth.

  4. Cut off the finger tip from a knit glove (I buy the really cheap ones from Walmart or Walgreens) This will be the knit hat. Top off the hat by gluing a small pom pom at the top.

  5. For the scarf cut strips from any scrap material. Glue a few colorful buttons down the front.

  6. The snowmen are adorable on their own but I taped them to two long board (painted white) and then set them in my window. I love them so much I didn't let the kids take them home until the end of February!


Check out these snowman crafting ideas on my Pinterest board.

http://www.pinterest.com/dsrtdeb/let-it-snow/

http://www.pinterest.com/dsrtdeb/let-it-snow/


Love these crystal snowflakes.  They’re super easy and looked so sparkly hanging in front of our windows.

They’re super easy and looked so sparkly hanging in front of our windows.

For the crystal snowflakes you’ll need:

pipe cleaners, 5 for each student, 3 long pieces and 2 cut into smaller pieces

string

pencil

wide-mouth jar, one for each student

Borax

boiling water 

Steps

1.  Twist three pipe cleaners in the center to form the six sides of the snowflake.  Cut (with wire cutters) three pipe cleaners in half.  Twist each of these smaller pieces around the end of the original six sides.  This adds a little more dimension to the snowflake.  Tie a string around one end of the snowflake and one around the pencil.  Hang it down into the jar to test the length.

2.  Add boiling water to the jar.  Let students stir in about 3 tablespoons of borax.  Let then stir very gently until the borax is dissolved.  You may need to add more borax.  The ration is about 3 T borax for every cup of water.

3.  Now hang the snowflake in the jar.  Let it cool overnight.  The next morning you should have beautiful crystals on the snowflake.  If the crystal didn’t form you probably didn’t have enough borax in the water.


Need a fun writing idea?  Try this creative snowman writing prompt.

https://docs.google.com/file/d/0B_TeTuAvino-NldXc1BTdmtZeGs/edit


0


your photo name
Back to Top