You need Editable Vocabulary Presentations!
Are you stuck in a rut with your vocabulary lessons? I have a way to make them fun and engaging. You can use PowerPoint or Google Slides to introduce, practice, and even quiz students on their spelling and vocabulary words. Don't worry that you're not an expert with PowerPoint or Google Slides. I've created the templates, complete with animations; all you need to do is type in your content!
It really is that simple. Each slide template had editable text boxes. You type in your words, sentences, clues, etc., and then you move these text boxes onto the slide, and it's all set. Watch this quick video, called Word Jar, to see how easy it is.
With these editable presentations, you can introduce your spelling list, weekly vocabulary lists, content area vocabulary, and much more.
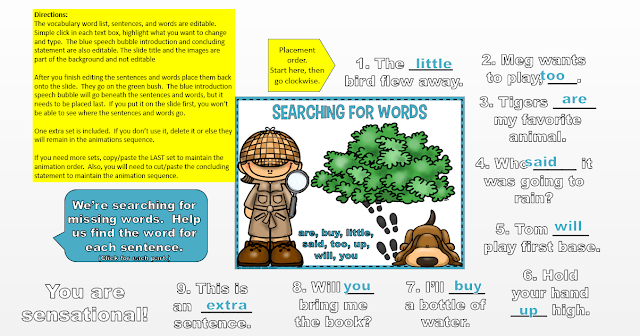
The slides are divided into 3 types:Blue Frame- These slides have sentences or clues about the words. The first blue frame slide has sentences with the word included in the sentence. The other blue slides have sentences with a blank, or clues about the words. Students read the sentence or clue and then guess the missing word.
Orange Frame- These slides focus more on saying, writing, and spelling the words. On two of the slides, students unscramble the letters to spell the word. On other slides, students say and spell the words. Two slides have clues about the letters, vowels, syllables, etc., and students guess the word.
Green Frame- These slides focus on saying the words quickly. The words are timed to appear on the slide for students to read the words on sight.
You can choose which slides you want to use and customize the words, sentences, and clues. Each slide has specific directions on how to customize and set the pieces onto the slide.
Customizing as easy as 1, 2, 3!
1. When you first see the slide, you're in Edit Mode. Most of the editable pieces will be outside the slide frame. You'll also see yellow boxes with the information/directions you need to edit and put the slide together.
While it's in Edit Mode, you can retype any text box. Simply click in the box and begin typing. You can also change the font style, size, and color of the font. You can also delete any text boxes you don't want or add additional text boxes. If you add text boxes, you will also need to add the animation if you want the text box to appear or disappear during the presentation.
2. After you type in the word list, words, and/or sentences, you must drag them onto the slide. Only pieces inside the blue frame will be seen during the presentation. Begin at the top and go clockwise. If there is a sentence with a missing word box, make sure to select them BOTH at the same time to drag them onto the slide.
The pieces will be stacked on top of each other, making them look jumbled as you drag them onto the slide. If there are any pieces you do not want to use, make sure to delete them. The pieces are animations that will appear and disappear as you click during Slide Show Mode.
3. Once all of the pieces you want are onto the slide, go to Slide Show to check it out.
Tip: Save the files you've edited with a new name. This will make sure the original file will not be changed. But don't panic if you forget. You can always download the file again from your Teachers Pay Teachers purchases page.
Please let me know if you have any questions about these Editable Vocabulary presentations.


