Meet and Mingle Friendship Bracelets

Thrifty Thursday:  New Year, New Class and New Friends!


Today’s Thrifty Thursday is all about friends.  At the start of each new school year kids are making new friends.  One activity I love has the kids mingling, talking and meeting new friends.  Along the way they are collecting beads on a pipe cleaner that will be made into a friendship bracelet.  Super simple, but oh so fun!  It's a way for shy students to mix and mingle in a structured way. 
  

From the dollar store you'll need a couple of packs of pony beads and pipe cleaners and snack size zip baggies.  The bag I found has 250 beads will be enough for about 10 students.  The pipe cleaners came in a package of 20.

First---count out pony beads, each student will need one bead for each person in class.  You can include yourself.  So, if you have 23 students you'll need to put 24 beads in each baggie.  

Second--- copy the Class Friends Question sheet.  The sheet has 5 questions. There are also a few extra lines so you can add your own questions.  Click on the image to download a free copy.
 Meet and Mingle New Friends


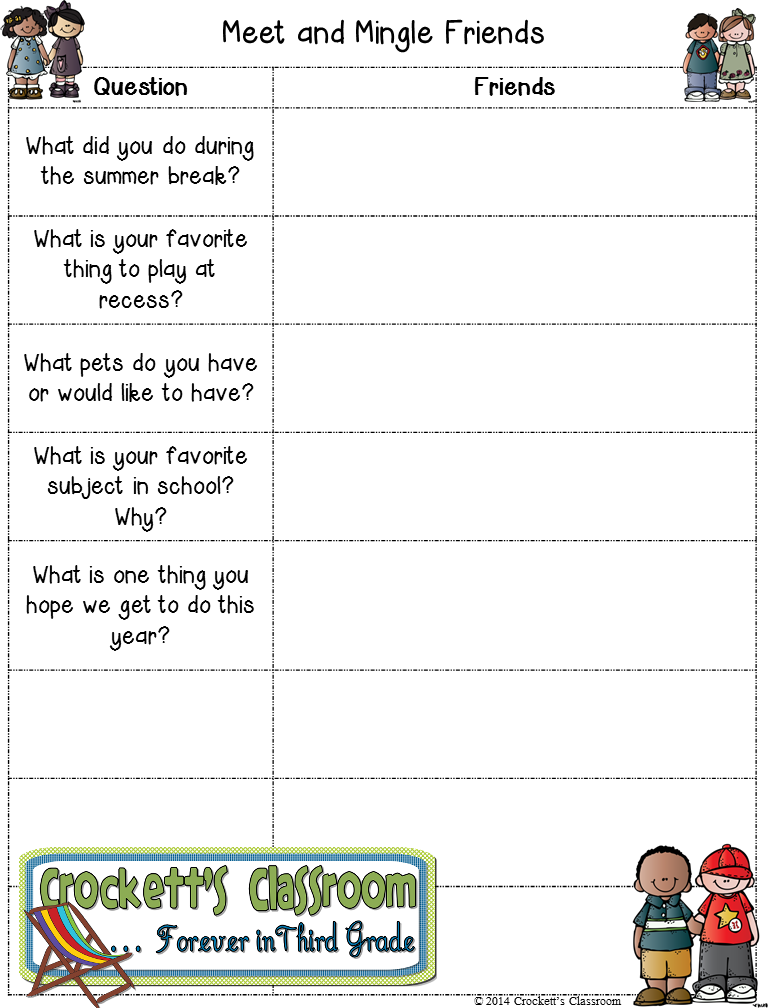
Third---Explain to your students that they will be meeting new friends today.  As they meet a friend they ask one of the questions from their Meet and Mingle page.  After they finish talking to their new friend they write the friend's name next to the question so they'll have a record of all their friends' names. 

Fourth---Before they move on to mingle and meet another friend they exchange beads.  These beads are added to their pipe cleaner.

When they're finished they should have the name of every classmate on their sheet and their bead baggie should be empty.

Finally--- Students twist the ends of the pipe cleaner to form the bracelet.  The bracelet should be large enough to slip over their wrist, but not too large that it falls off too easily. 


2


your photo name

Tried and True Teacher Tip: Interactive Charts

Interactive Charts are a fantastic way to get students involved in a lesson!

Anchor charts seem to be popping up everywhere!  I love them, but why not get more from them by making them interactive.  Instead of just presenting information, add an interactive element so kids can feel more involved.

Interactive elements:  (Week One)
-Space for kids to add sticky notes
-Pockets for kids to add something

Since I'm artistically challenged I create my charts with the cut and paste method.  I create the title and other elements on my computer, cut them out and glue them in place when I'm introducing the anchor chart in class.  I love, love , love the Elmer's Craft Bond Repositional glue sticks!  They're perfect for these anchor charts.

Anchor Chart Examples:  

Sticky Note Spaces--- When you create your anchor chart, design spaces for students to add sticky notes.
Students use sticky notes to add their thoughts to this anchor chart.


Great anchor chart to use during reading lesson or a whole class read aloud.


Pockets--- Why not add pockets to your anchor chart?  When you're talking about solving word problems students can search for words that indicate the problem will requiring adding or subtracting.  These key words and phrase can be written on the chart.  Then word problem task cards can be sorted into the two pockets.


This sorting activity can be used over and over.  It's also a great anchor chart.

You can see the Word Problem Task Cards, with QR codes in my store:  
 Word Problem Task Cards, with QR codes

Check out these other terrific ideas on Tried and True Tuesday Teaching Tips.  
 Tried and True Tuesday

1


your photo name

Math Facts Fluency


What exactly is math fact fluency?  It isn't about speed as many people beleve.  NCTM President Linda M. Goja summed it up this way in a 2012 article, Fluency: Simply Fast and Accurate? I Think Not!

"Focusing on efficiency rather than speed means valuing students’ ability to use strategic thinking to carry out a computation without being hindered by many unnecessary or confusing steps in the solution process. Accuracy extends beyond just getting the correct answer. It involves considering the meaning of an operation, recording work carefully, and asking oneself whether the solution is reasonable."

Your weekly math routine should include strategy lessons as well as time to practice basic facts.  If you choose to use timed drills, the time should be long enough for students to apply the strategies they're learning. (And I don't consider counting on your fingers as a strategy!)  With practice, the facts will become more automatic as students apply the strategies more quickly.

Here are some strategies that worked well in my classroom:
1. Zero rule, 3 + 0 = 3 / 5 - 0 = 5  and 6 X 0 = 0 / 8 ÷ 0 = 0
2. Counting up or backwards, works well when adding or subtracting by 1 or 2
3. Ones' rule for multiplication and division, 6 X 1 = 6 / 9 ÷ 1 = 9
4.  Fact Families, works well because students learn the relationship between addition/subtraction and multiplication/division.
5. Doubles, kids love to memorize these facts.  9 X 9 = 81 is always their favorite!
6.  Nines,  since nine is just one away from 10 there are some nifty tricks to add, subtract, multiply and divide by 9.
7. Numbers with zero in the ones place.  Kids should quickly see that 7 + 10 = 17 and 14 - 10 = 4.

I know there are many more fact strategies and you probably have a few of your own favorites.  I'd love to hear what works in your class.  Please share your favorite strategies in the comments section below.

Games are a great way to get kids to practice the facts.  This game, Catch Me if You Can, is super fun and can be used with any skill practice.
 Catch Me if You Can--Crockett's Classroom

Students answer questions and then move around the board trying to "catch" the other player. Click on the pictures to download your free copy.
 This super simple game can be used to review math facts, spelling words, or any other academic skill.  It's also a fun way to spice up your task cards.


Need more ideas for how to teach strategies?  Math Strategies to use everyday  has ready to go signs and practice sheets to help your students gain fluency in addition, subtraction, multiplication, division, elapsed time and estimation.  Click on the cover page to see this wonderful math packet in my TPT store.

 Math Strategies for Everyday


0


your photo name

Displaying and Organizing Your Objectives

 Let's Get Organized----Crockett's Classroom


Displaying and Organizing Your Objectives


Most classrooms are required to post their daily or weekly objectives.  Whether these objective are the CCSS or standards written by your state or district, you need a way to display them and keep them organized.  I've gathered a few ideas that will work in a variety of classroom settings.


Plastic Sleeves are the key!     
These are super easy to use in a display because the objective can slip in and out so easily.  You can attach the plastic sleeve, with double sided tape, to a piece of scrapbook paper. Add a header and your display is ready! (Links to the headers and objective posters are at the end of this post.)

Ideas for displaying objectives---Crockett's Classroom

Then your objective will slip right in!

Using plastic sleeves for objectives display --Crockett's Classroom

Your display could look something like this:
Classroom objectives display---Crockett's Classroom

The plastic sleeve/scrapbook paper idea works well if you have a bulletin board or wall space for your display.  But sometimes I want to save that precious wall space for student work displays.  My classroom had really nice cabinets and I found a way to use them for my objectives display.

I used little clear plastic hooks.  These Command hooks are great. They go on easily, stay put and are easy to remove without any tape residue.


Clear hooks to display classroom objectives--Crockett's Classroom


The plastic sleeve will then hang on the hook!

Classroom objectives are easy to change with hooks --Crockett's Classroom

 This works really well if you have cabinet doors or other surfaces that won't take staples or pins.  

Display classroom objectives on cabinet doors--Crockett's Classroom

Now, how do you keep your objectives organized so you can find them quickly?  There are two main ways- file folders or a binder.  I prefer a binder.  I purchase a bunch of really cheap plastic sleeves and put two objective in each, back to back so you can see the objectives from both sides.

Plastic sleeves for classroom objectives --Crockett's Classroom

Then I put them all in a binder.  Adding subject tabs will help you find the different types of objectives more quickly.


Organize and store objectives in a binder --Crockett's Classroom

When you lift the tab you'll see the objective!


Organize and store objectives in a binder --Crockett's Classroom


One more idea . . . .  for smaller spaces.  

Did you know you can print 2 images per page with Adobe Acrobat? It's so cool to print a smaller version when the full page is too big.  You can print 2 or 4 images per page.  Here's how . . 
 From the print screen follow these simple directions:


mulitsheet printing with Adobe Acrobat---Crockett's Classroom

With these smaller posters and headers you can create a display for a small group area or a small classroom. 

 I found a super cute green polka-dot burlap ribbon in the clearance aisle at Walmart.  I also purchased these tiny super strong magnets.


 I used a quick drying glue to attach the subject headers and magnets to the green dot burlap.  After the glue dried I was ready to attach the top sign that says, Daily Objectives.(download for free!  see below)

Once it was hanging I could use another magnet to hold the objective in place.  Now the objectives can be switched out very easily because they're held on with magnets.
Tiny magnet holds small signs in a display--Crockett's Classroom

Small display for Classroom Objectives

 Like what you see?  You can have all of this for your classroom!  The headers are available on Teachers Pay Teachers from Learning in Wonderland and the objectives/CCSS posters (K-3) are available from Crockett's Classroom.  You can click on the store links below to check them out.  You can download the free Daily Objective sign (four different colors)  for the small display here.

 Crockett's Classroom Learning in Wonderland  


0


your photo name
Back to Top