Organization is key to running a smooth and successful literacy block. When your materials are organized and
students know how to maintain the organization you have time to focus
on your lessons.
First
you need to think about your space. What
type of storage area do you have? Do you
have
- counter top space
- shelves
- cabinets
- none of the above
I've been in classrooms with amazing cabinets and counter top space. And then, other classrooms with only a few open shelves. (Don't you wish they would hire a teacher to help design classrooms!!) If you don't have adequate storage space you may want to add furniture to your classroom. Since most schools don't have the budget to buy more furniture, you may need to go shopping for yourself. Second-hand stores, like Goodwill, are the first place I look. You'll be amazed at what you can find that just needs a little bit of cleaning or a coat of paint. Garage sales can also turn up great treasures, but it can be time consuming driving from sale to sale.
Next, what will hold the
materials for each center? Tubs, bins,
file drawers, or a cart are great for organizing the specific materials for your
centers. The books, papers, pencils,
crayons, game pieces, etc. for each center should be kept together in one
container. It’s also easier if the
center containers can be removed from the storage area and taken to a work space.
Tubs
or bins work well if you have a cabinet or shelf
storage area. Tubs
and bins can also
be kept on a counter top. When choosing this type of storage look for a
set at least 10” by 12” so they will hold regular sheets of paper. You also want it deep enough to hold the
other materials needed for the center (pencils, scissors, glue, crayons, etc.)
Check out the lid for the bin. Make sure it closes securely and is easy to get off and on. Another important feature is their ability to be stacked. Many have lids that are designed to be easily stacked without sliding off of each other.
The bins in these photos are by Sterilite. They're 11" by 14" and
2.75" deep. I like the way the lid clamps on. Being
see-through is a plus because I can see what's inside without taking off the
lid. And, the lid is designed for super easy stacking.
Drawer Sets are an easy and inexpensive way to store your centers. These drawers are 9" by 12" and can be removed so students can take them to their work space. That's large enough for regular size paper and a few supplies. They do not have a lid, so kids have to be careful when moving from place to place. Two sets can be stacked on top or beside each other.
File drawers are a convenient option because most classrooms have a file cabinet. You can use file pockets to hold the paper materials for the center and a separate box for the other materials. The file pockets aren't as durable, but they're easy for students to take out and then return.
Carts with drawers are great if you have limited storage
space in your classroom. Wheeled carts work well because they can be brought into a work space during center time
and then put away later. Look for a cart
that is sturdy and not wobbly when wheeled around. You can usually find these carts at craft and hobby stores. Keep your eyes open for back-to-school sales or their coupons. I recently found these two at Michael's Craft store.
The cart on the left has 10 drawers with a light metal frame. The cart on the left has eight drawers and is a little more expensive. The drawers are larger and the cart much more sturdy.
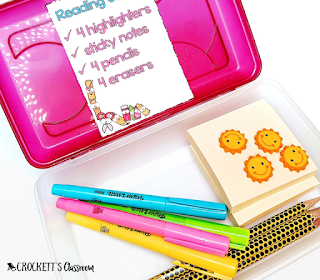
Materials caddies or boxes can ensure that students have everything they need at their work space. These little boxes can be filled with crayons, pencils, scissors, and glue sticks. Including a picture of the organized box will help students know how to repack the box.
Labels
are a must! You
should label the
bin or box with the name of the center. Make sure the lettering is easy
to read. If possible, color coding the label and the materials inside
helps kids know which materials go into each container. A materials list will also help the students know if they've returned everything when they're cleaning up. A picture of how the contents should look will help if there are lots of
materials and they fit in a certain way.
All of this helps students know the high expectation you have for
taking care of the materials.
To
help you get started with your labels, you can download this free set of
editable labels to use on your containers. I
designed them to be printed on whole-sheet (8.5 X 11) shipping labels. This way you won’t get frustrated when the
label design doesn’t fit exactly on the label.
You do have to cut them out yourself, but I’d rather do that than throw
out a whole page because it didn’t feed through my printer perfectly. Plus I
can make the labels any size I want and not the ones predetermined by the label
companies.
You can download this free set of editable labels to begin organizing your literacy centers. Click on the picture above to download the PowerPoint file.
Important: You must download and then save the PowerPoint file to your computer or device before you edit. Once you've downloaded and saved the file, start your PowerPoint program and open the label file from there to begin editing.
Happy organizing!


