Objectives displays

Monday Made it! July 28, 2014
 Monday Made It

My very first Monday Made it, soooo excited to join this fun linky.


I’ve been collaborating with Learning in Wonderland.  She has an adorable set of headers that she uses in her class to display her daily objectives.  And I have a set of CCSS posters.  This week I reworked my posters to match her headers and they turned out amazing!  
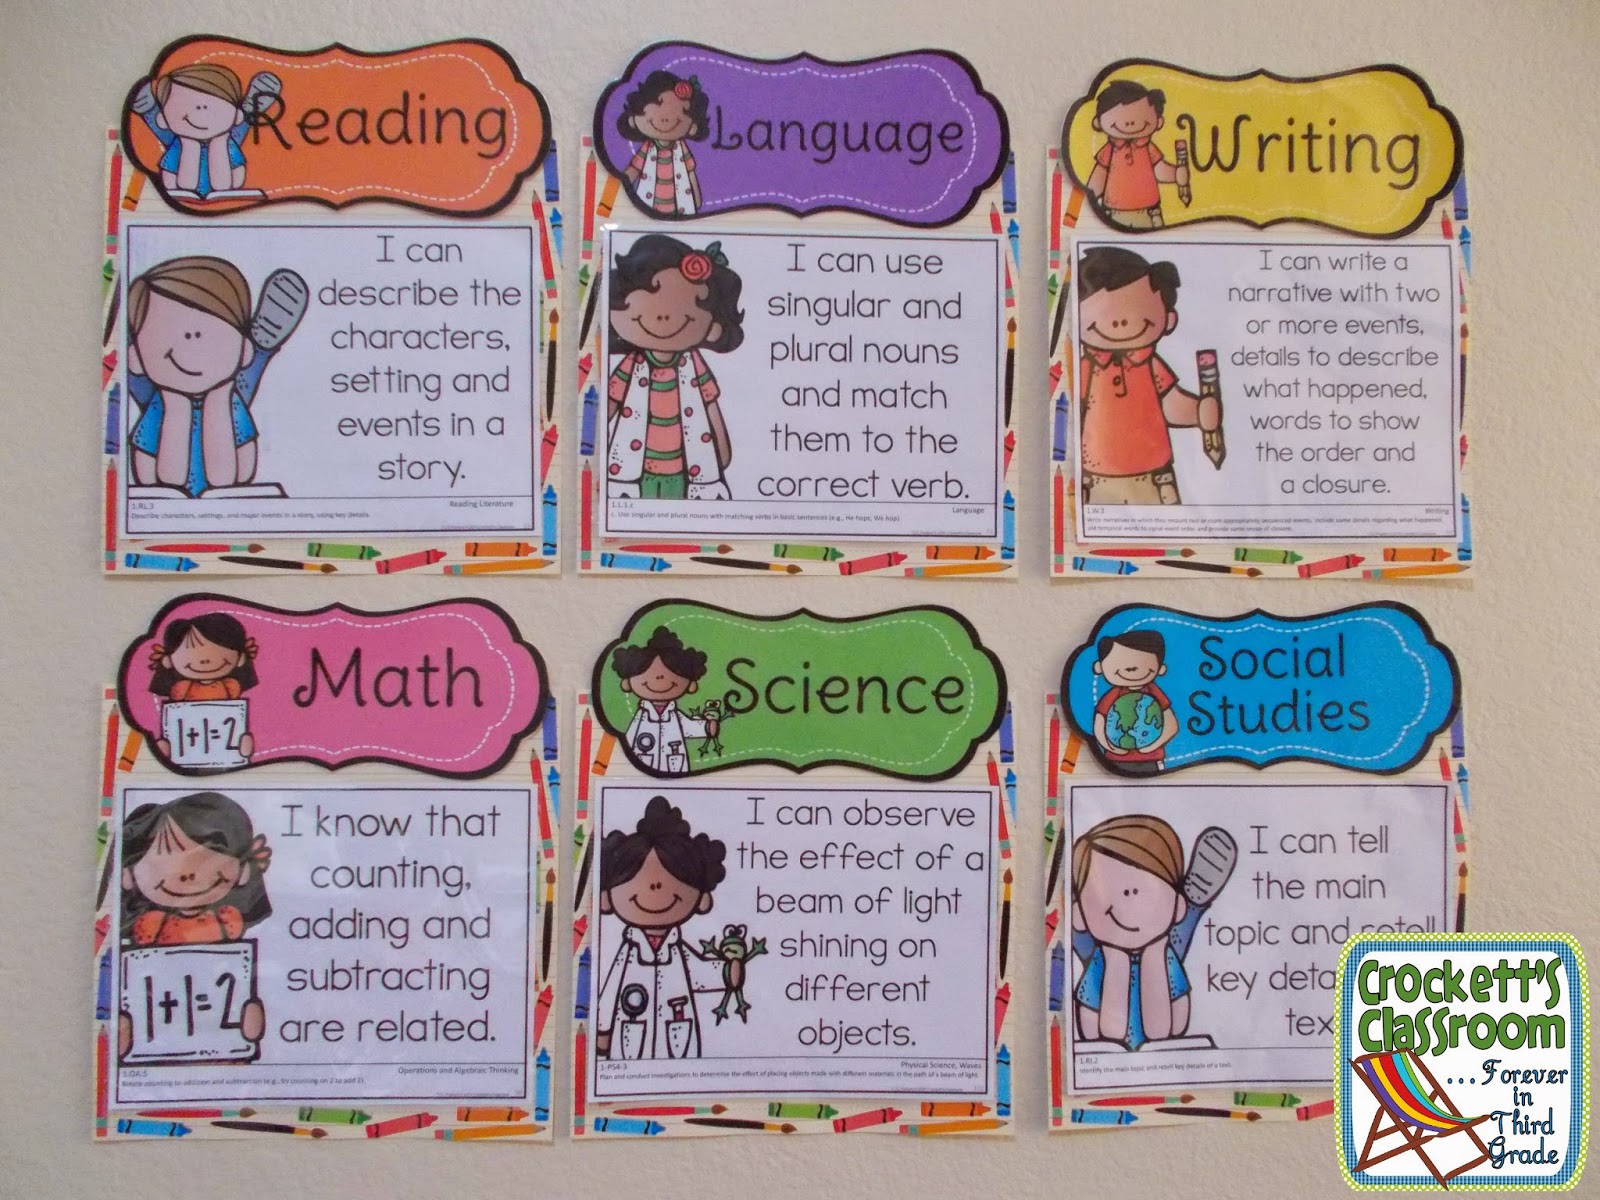

 First Grade CC Posters---Crockett's Classroom

The posters really stand out with the graphics from Melonheadz!

 First Grade CC Posters---Crockett's Classroom

For the display I chose a scrapbook paper that looks like lined tablet paper with a border of pencils, brushes and crayons.  The objective posters slip so easily into the sheet protector I attached with double sided tape.


Plastic sleeves with a piece of scrapbook paper behind it is a super easy way to display your daily objectives.

The bright headers from Learning in Wonderland bring it all together for a truly dynamic display!
Daily Objective display with plastic sleeves and scrapbook paper.

 So far I have the CC posters with the Melonheadz graphics and for First Grade and Second Grade.  I plan on getting the sets for K and 3 ready in the next few weeks.  You can get the first grade poster set here.  

Follow Crockett’s Classroom on TPT and you’ll get an email when I add the other sets to my store.


1


your photo name

Writing Genres


Are your students stuck when asked to write in different genres?  They'll love this writing project that introduces six different grenres.

Writing Genres:  Helping your students write in different genres.

I don't know the statistics, but I would guess that over 80% of your writing lessons focus on narrative writing.  I know I did in my classroom.  Once in a while I'd throw in a lesson on writing a letter, and once a year that animal research report, but not much else throughout the year.

A few years ago I attended a conference and one of the ideas presented was teaching the genres of writing through one topic.  I think the topic she used to demonstrate the idea was horses, an appealing topic for most kids.  She had her students write a fantasy story about a flying horse, an informative piece about caring for a horse, a persuasive piece about the best breed of horse, a poem about a horse and a descriptive piece about how it feels to ride a horse.  Using just one topic, horses, the students gained a much better understanding of the differences between the genres.
 Writing Genre chart


Light bulbs went on all over the room!  Every teacher began thinking about topics that would interest their students and would work easily with different genres. Since it was winter I came up with my first genre writing project with a snowman theme.  The kids loved it!  And I loved it too, because it was an easy way to introduce the different genres and get the kids exciting about writing.  The next year I added the scarecrow project to my fall writing schedule and followed up in the winter with the snowman project again.

I've polished these ideas and now have them available in my TPT store, along with a Spring Garden Writing project, added this past spring.

In each packet you'll find 6 different genres (the genres vary slightly with each project), writing guides/checklists, graphic organizers and final writing papers for publishing into a book. (Click on the image for a free sample from my Scarecrow Genre Writing Project) 
Scarecrow writing genre free sample

For more great ideas for Fall, head over to Teaching Science with Lynda.
 Fall Freebie Link- Up


And then check out Crockett's Classroom on TPT for all three genre writing projects:

 Snowman Writing Project--Crockett's Classroom
 Scarecrow Genre Writing Project--Crockett's Classroom
 Spring Garden Genre Writing Project--Crockett's Classroom


0


your photo name

Puzzle Reward

Thrifty Thursday----Puzzle Reward

This Thrifty Thursday idea is quick and easy.  

It seemed like I was always looking for another way to motivate students, especially around the holidays or when spring fever hit. For this idea, all you need is a small jigsaw puzzle from the dollar store and some sticky-back magnets.  Put a piece of magnet on the back of each puzzle piece and you have an instant class motivator!

Here’s the How-to:
1.  You'll need one jigsaw puzzle.  I used one with 24 pieces, but they come in different sizes. You'll also need sticky-back magnets.  I found this package of two sheets at Walmart for about $3.00.  I like them because the magnets are thin.  They also have magnetic tape and small circle magnets. 
  

2.  I cut one magnet sheet into small pieces. Check the space you have on one of the puzzle pieces.  You want the magnet to fit on the back without overlapping into the open space where another piece will fit. The thin sheet cut very easily with a paper cutter.


3.   Now you're all set to begin.  Choose one area of your white board to collect the pieces and build the puzzle.  If you don’t have a magnetic white board you can use a cookie tin or other magnetic surface.
4.   Decide on the reward the class will earn when all the puzzle is finished.  It's a good idea to write the goal in the same area where you'll build the puzzle.

5.   When the class is doing what they’re supposed to be doing, choose someone to add a puzzle piece to the board.  At first the puzzle pieces will just be placed on the board.  But, as more pieces are earned the kids will begin to see where one piece attaches to another piece.


6.  Keep track of the students who get to add a piece.  You can keep an envelope nearby with student name slips.  After you choose one name, don't put that slip back in the envelope.

Alternate idea:  Choose a focus behavior.  Perhaps the class is being a bit too chatty.  Set that as the behavior you're looking for.  When you see someone working quietly, or standing in line without talking, etc.  Ask them to add a piece to the puzzle.  Sometimes I would choose a different focus behavior each day, depending on areas of need.


0


your photo name
Back to Top