
An Avalanche of Snowman Ideas
Brrr! Its cold outside. Well, not really. Here in the deserts of Arizona we like to pretend it's cold outside. One way we get in the winter spirit is to bring some fun "frosty" activities into your classroom.
Who doesn't love snowmen! I grew up in the Midwest and remember spending the day outside building a snowman and then clomp, clomp, clomping back into the kitchen where my mom would pour me a cup of hot chocolate.


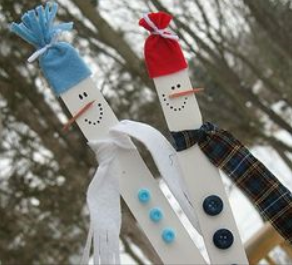
Since my students can't build snowmen outside, we do it in our classroom. My favorite is the snowman fence.
Get a free paint stick for every student from your local home store.
Students paint the sticks white.
They can use markers for the eyes, nose and mouth.
Cut off the finger tip from a knit glove (I buy the really cheap ones from Walmart or Walgreens) This will be the knit hat. Top off the hat by gluing a small pom pom at the top.
For the scarf cut strips from any scrap material. Glue a few colorful buttons down the front.
The snowmen are adorable on their own but I taped them to two long board (painted white) and then set them in my window. I love them so much I didn't let the kids take them home until the end of February!
Check out these snowman crafting ideas on my Pinterest board.
http://www.pinterest.com/dsrtdeb/let-it-snow/
Love these crystal snowflakes. They’re super easy and looked so sparkly
hanging in front of our windows.
They’re super easy and looked so
sparkly hanging in front of our windows.
 For the crystal snowflakes you’ll need:
pipe cleaners, 5 for each student, 3
long pieces and 2 cut into smaller pieces
string
pencil
wide-mouth jar, one for each student
Borax
boiling water
Steps
1.
Twist three pipe cleaners in the center to form the six sides of the
snowflake. Cut (with wire cutters) three
pipe cleaners in half. Twist each of
these smaller pieces around the end of the original six sides. This adds a little more dimension to the
snowflake. Tie a string around one end
of the snowflake and one around the pencil.
Hang it down into the jar to test the length.
2.
Add boiling water to the jar. Let
students stir in about 3 tablespoons of borax.
Let then stir very gently until the borax is dissolved. You may need to add more borax. The ration is about 3 T borax for every cup
of water.
3. Now hang the snowflake in the jar. Let it cool overnight. The next morning you should have beautiful crystals on the snowflake. If the crystal didn’t form you probably didn’t have enough borax in the water.
Need a fun writing idea? Try this creative snowman writing prompt.


No comments
Post a Comment